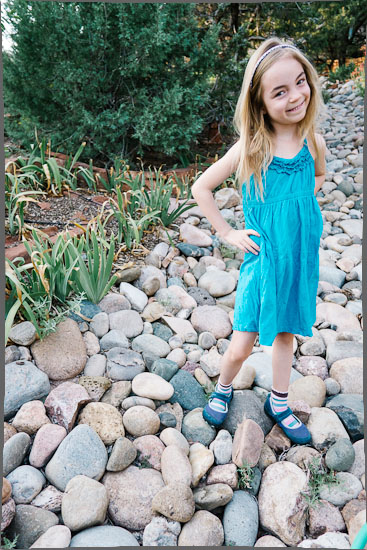
The portrait photographer’s go-to look often has the subject in sharp focus, but the background out of focus. This draws the eye towards the face of the subject, and tidies up distracting elements in the background, leaving behind that gentle blurred patterning known as ‘bokeh’.
A combination of factors is creating a narrow depth of field – in other words a small plane of the depth of the image is acceptably sharp, and the rest blurred out. Most of the time the sharp area is to the front, and the area behind is out of focus, but technically everything in front of the sharp area will be out of focus too (but it’s normally thin air so you don’t see the blur), but sometimes you’ll see a shot that’s layered to go from blurred to sharp to blurred again.
I often get asked how you can get this background blur, so here’s an overview of the the five factors at play in achieving that creamy bokeh.
1) Lens with a fast aperture
A lens that can open wide to admit a lot of light will also have a narrow depth of field. This large opening – a wide aperture – is somewhat confusingly indicated with a low f-number. So a lens at f/1.8 for example lets in much more light than a lens at f/8, and will produce a much narrower depth of field.
A 50mm lens at f/1.8 focussing on a subject 10′ away gives a depth of field of 15.5 inches. The same lens and distance at f5.6 has a depth of field of 4′ 3 ” – nearly four times as wide.
The plane that’s in focus will fall about one third in front of what you’re focussing on, and two-thirds behind it. So taking the f/1.8 example above, everything from 9′ 7″ away from the camera to 10′ 10.5″ will be in focus.
Of course, the other main benefit of these fast lenses is that they by letting in a lot of light, they allow you to use a faster shutter speed to freeze movement in low light. But this creates problems when you want narrow depth of field in bright light. Your camera might have not have a shutter speed that’s fast enough – in full sun at f/1.8 and ISO 100 you might need 1/8000th of a second or faster (many cameras only go to 1/4000th). You can use neutral density filters to reduce the amount of light hitting the sensor, allowing you to use a slower shutter speed to get the same exposure.
This ability to produce a narrow depth of field is one of the key strengths of prime lenses. Kit lenses (the zooms you see bundled with camera bodies) can often only reach f/4 or higher, and even the most expensive zoom lenses tend to stop at f/2.8, while affordable primes can reach f/1.8 or f/1.4. That might not sound like much difference, but when I’m shooting portraits, I live under f/3.2.
2) Focal length of the lens
The second factor influencing bokeh production is the length of your lens – the longer the lens the narrower the depth of field you’ll get when all other things are equal. So a 135mm lens at f2 when the subject is 15′ away gives a depth of field of only 5 inches, while if you’re using a 35mm at f/2 at the same distance subject the depth of field is a sturdy 7 feet.

So to repeat, f/2 will give widely differing depths of field depending on the focal length of the lens. This is true across different focal lengths of the same zoom lens. If you’re photographing a group where some people are standing in front of others, f/2.8 might be fine to have all the faces in focus while you’re at the 24mm end, but it might well be too shallow if you’re at 70mm end. Speaking from experience, I can confirm that it’s so easy to rack the zoom in for a more detailed shot and forget about what you’ve just done to the depth of field unless you adjust your aperture too.
3) The distance from the camera to the subject
In all the above examples of depth of field, I’ve been careful to give the distance from the camera to the subject because the closer the subject to the camera, the narrower the depth of field. If you’re focusing on a tree across the other side of a field, then the difference between f2.8 and f8 wont make much difference if any. But if you’re photographing a flower close-up the depth of field will be so shallow you’ll have to be careful parts of your subject aren’t out of focus inadvertently.
At 3′, a 50mm lens at f/1.8 gives a depth of field of 1 1/3 inches, where as we saw above if the distance is 10ft the depth of field is 15 inches. If the distance is 100′, everything from 25.5′ back to infinity will be in focus – this is because we’ve reached beyond what’s known as the hyperfocal distance for that lens at those settings (the hyperfocal distance is that distance beyond which everything in an image is in focus).
4) The distance from the subject to the background
The closer the subject is to the background the harder it will be to blur it. If someone’s standing right in front of a brick wall, you’ll need a narrower depth of field to get their face in focus, but the wall blurred behind them. But if they’re standing 10′ in front of the wall, you can use a wider depth of field and still be sure the wall is blurred.

Balancing your factors
Bearing in mind these four factors will let you control how much background blur you can get. Sometimes it can be a trade-off between the different factors. Say you’re using a kit zoom for a portrait, and you’d like to blur the background. You know that you should get closer to your subject, and make sure the background is far away.
Getting closer means you’ll probably have to use a shorter focal length lens to get a wide enough field of view to fit the whole of the subject in; but a shorter focal length (a wider angle lens) means a larger depth of field. So maybe you’d be better standing further away, but using the longer end of the zoom – say 70mm not 24mm.
Ah, but your kit lens goes to f/4 at the wide end (24mm), and only f/6.3 at the longer end (70mm). So the same shot could be taken at f/4 and 24mm at 4′ or f/6.4 and 70mm at 12′. Which will give the narrower depth of field? Experienced photographers might have an instinctive feel for the answer to these type of questions, but if in doubt, use a depth of field calculator (I use an iPhone app called DOFMaster which hasn’t been updated recently, but since the maths doesn’t change, it’s not that crucial. There’s also a good online calculator here).
Running the numbers, I get that the 24mm options gives a depth of field of 1.15ft, and the 70mm option gives a depth of field of 3.41ft. So in this case, getting in close with the 24mm gives the narrower depth of field, but the 70mm will work too, so long as the background is more than 2 ft behind the subject (2/3rds of the depth of field). Since the 70mm end will compress the face of the subject slightly in a flattering way (because you’ll be further away), while the 24mm will expand the face and distort some angles, I’d probably go with the 70mm end of the zoom (trust me on the face compression thing – the compression effect of long lenses is a whole other topic I’ll deal with another time, but here’s a primer on it).
A note on the crop factor of sensors
You might be wondering what effect using different size sensors has on these calculations – for example the sensors in ‘full-frame’ cameras such as the Canon 5D series are much larger than those in point and shoot cameras. The big difference is that crop factor changes your field of view for the same lens.
A 35mm on a full frame camera will have a wider field of view than the same lens put on a body with an APS-C sensor, where it will give a field of view more like that of a 50mm lens (the crop factor on Canon DSLRs with APS-C sensors is 1:1.6, on Nikons it’s 1:1.5). So it will appear when you look at the finished photograph that the 35mm lens is more zoomed in on a crop sensor body, because the sensor only captures the center of the image, not the edges.
To get exactly the same composition with crop and full -frame bodies, you’d need to either move your position (getting further away with the crop body – which increases depth of field), or stay in the same place and swap to a wider lens on the crop body (which also increases depth of field).
So crop bodies use wider lenses to replicate the same apparent fields of view of a full frame camera. An 18-55mm zoom on a crop body behaves much like a 24-70mm lens on a full frame.
In some cases you can replicate the same composition and narrow depth of field between a crop and full frame, but especially with wide angle lenses, it’s hard for the crop body to give as narrow a depth of field as a full-frame. If you’re a landscape shooter, that’s probably not an issue, but if you do portraits it is.
For example to reproduce the same depth of field and angle of view as a shot taken with a 35mm f/1.4 on a full frame camera with a APS-C sized sensor would need a 22mm f/0.9 lens – and good luck finding one of those. (To play with these options, here’s a nice calculator.)
The small sensor size in most point and shoot cameras explains why it’s almost impossible to get a blurred background with these cameras (or camera phones) – the lenses are optically just too wide to deliver a narrow depth of field without an impossibly fast aperture.
Questions, comments?
This can be a tricky concept to get your head around, and I’m always aware when writing more technical posts that I’ll get two simultaneous reactions from different groups. People who know more about the technicalities of the topic (often way more than I do) will point out my mistakes in painstaking detail, and other people will get a blank look when I first start mentioning f-numbers. But as a working photographer, my understanding of things as I’ve laid it out here has seen me through most situations, and for beginners to this topic, I feel it’s important to have a handle on the basics so you have more chance to getting the type of images you want.