Categories
News Photography Tips/Tutorials

Do You Suffer From GAS – Gear Acquisition Syndrome?

Gear is a necessary and enjoyable part of the photography process. But sometimes we can spend way too long thinking about good gear, and not enough working to improve our photography.

In this guest post for Seshu’s Tiffinbox blog, I describe the problem of gear acquisition syndrome, and then outline some steps to cure it.

> Read the full post over here.

Categories
Children's portraits Photography Tips/Tutorials

“Same time next year?” Making a regular date for family photographs

This week a quick video on how setting a regular time for your own family photo session helps you create a lasting archive of your kids as they grow and change.

Music: “Evening Seaside” by Inspector 22

Do you have regular dates you make for your family photographs? Let me know in the comments below.


Categories
Photography Tips/Tutorials

How to blur the background in your photographs

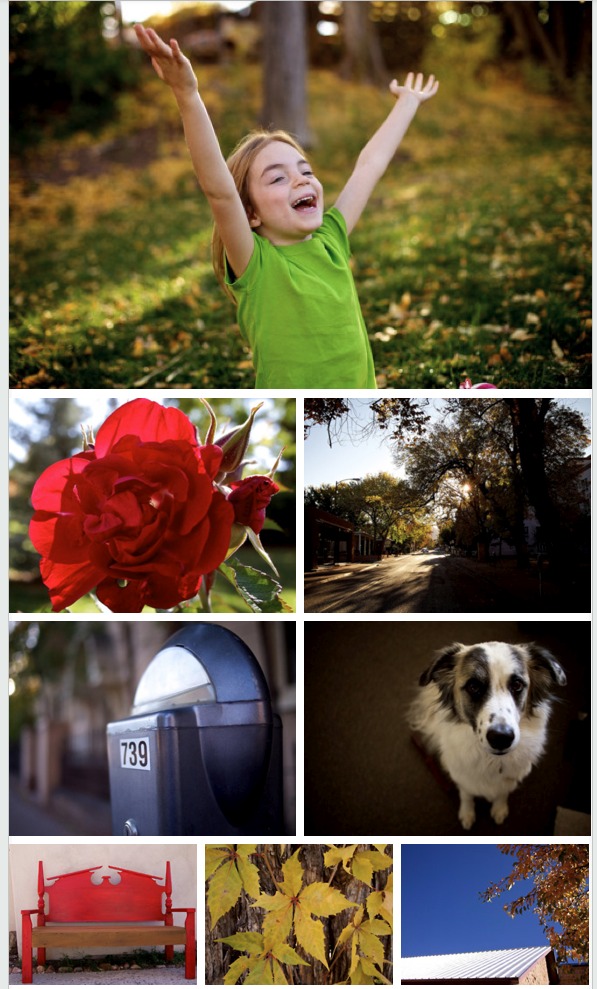
Cute girl? Check. Blurred background? Check. Canon 5D II, EF 85mm f/1.8 at f2/.8.

The portrait photographer’s go-to look often has the subject in sharp focus, but the background out of focus. This draws the eye towards the face of the subject, and tidies up distracting elements in the background, leaving behind that gentle blurred patterning known as ‘bokeh’.

A combination of factors is creating a narrow depth of field – in other words a small plane of the depth of the image is acceptably sharp, and the rest blurred out. Most of the time the sharp area is to the front, and the area behind is out of focus, but technically everything in front of the sharp area will be out of focus too (but it’s normally thin air so you don’t see the blur), but sometimes you’ll see a shot that’s layered to go from blurred to sharp to blurred again.

I often get asked how you can get this background blur, so here’s an overview of the the five factors at play in achieving that creamy bokeh.

Categories
Tips/Tutorials

Using a Neutral Density Graduated Filter – not just for landscapes

Normally thought of as a tool for landscape photographers, neutral density graduated filters (or ND grad filters) do a simple thing well. They reduce the amount of light hitting the sensor from one part of the image, their shading fading gradually to letting all the light in to the rest of the filter.

This gradation normally means the top-half is filtered and the bottom half not (but there are lots funky ways of adjusting this using filter holders and stuff I won’t go into here.

The classic usage is to darken the skies to keep detail there while getting a good exposure on the mountains in a landscape shot.

Categories
News Tips/Tutorials

Behind the scenes at an editorial portrait shoot

Earlier this year national medical magazine PracticeLink hired me for an assignment to shoot an editorial portrait of Dr James Melisi, a surgeon who had recently moved to Santa Fe from the Washington DC area.

My background is journalism from the writing side of things, and I’m always keen to understand the angle the article’s taking, so I can get my images to match. The piece was about his move and how he’s enjoying the history and landscape of northern New Mexico. An amateur photographer, the good doctor has already had a show of his work in a local cafe.

The brief was to photograph him in a distinctive historical Santa Fe setting maybe including his camera to show the new enthusiasm he’s found for photography. The magazine liked my work and my approach, so I spoke to Dr Melisi and suggested we meet downtown for a bit of a two-man photowalk. The simple plan would make it easy to shoot in a few public spots without having to move light stands and the rest.

Simple not random

‘Simple’ doesn’t mean unplanned however, and before the day of the shoot I walked a potential route with my camera checking the light, the backgrounds, sizing up different angles.

Part of the challenge of portraits using only natural light (with a bit of reflector here and there) is keeping the faces well exposed without blowing out the sky. Another issue is that nobody looks good in hard sun full on their faces.

Categories
Children's portraits Tips/Tutorials

A young girl’s adventure – digital storytelling revisited

We take photographs of our children for one main reason – to capture memories of the people we love. Images help us remember what they were like when they’re all grown up and living half a world away (like me – sorry, Mum).

Most of our memories get spun into stories – “Remember the time, when . . .?’ we ask each other, and the story we tell puts our loved one in context, as their actions reveal more about them.

And so while photos are a great way to trigger these stories, there are other techniques that can incorporate photos and also deepen the experience as well. Recently, I’ve been thinking more and more about different types of digital storytelling.

Just looking at individual photographs on our screens doesn’t fulfill all the potential current technology offers, and we don’t get a narrative flow that adds up to more of a story. Printed albums work because the images build on each other, and have a rhythm that is more rewarding for the person looking at them.

Categories
Creativity Tips/Tutorials

How I learned to get out my own way and shoot more

Why do we why find it so hard to do the things we know we should do? I don’t even mean exercising or eating the right things here – I’m just thinking about taking photographs.

As keen photographers of whatever stripe, you’d think we’d be out the whole time firing off shot after shot, especially now there’s no immediate cost to shooting one more digital image.

But I’ve found that unless I have a paying job, the cameras might stay in their bag from one week to the next. And the longer this goes on, the more grumpy I get.

So I came up with a two-fold plan to counteract this. The first stage was to buy the Olympus EPL-2 (part of the PEN series) and the Panasonic 20mm f/1.7 pancake lens and leave them in my laptop bag, so I’d always have a camera with me.

This stage wasn’t completely necessary, but I did leave the big lad at home more than I’d bring it, unless I was going out to shoot something specific.

The second step was to set myself a challenge to post eight images every week to a new Tumblr site I set up, called 8 Days a Week. A photo project was born

I thought that I’d be likely to fail if I made myself shoot every day, but I still wanted to make taking photographs into a habit, so delivering eight images every Monday seemed reasonable. That way, if there were three or four good shots from one day, and none for a couple of days, my system was flexible enough to deal with it.

I’m into my fourth week now, and it’s amazing what a feeling of obligation can do for you, even if it’s self-imposed. Our dog comes to the office with us most days, so I grab the camera while she’s getting her lunchtime walk, and at other times too I’m looking for images in a way I wasn’t before.

No Pressure

Most of the time I’m not thinking about whether the images are good or not, I’m just getting them in the camera, and I’ll worry about quality later. That way, there’s no pressure on me to produce – I can just follow my nose.

And coming up with only 8 images each week that I’ll be sharing with the world doesn’t seem that frightening.

Often it seems I don’t have the willpower to make myself do things when my internal resistance tells me that I have to work or that there’s no point taking these stupid shots anyway.

But I am a creature of habit, and if I can persuade myself that I’m just messing around anyway, I can sneak in some shooting before the resistance knows what’s happening. That, and it’s fun.

You can see all three weeks’ work here, or on the Clearing the Vision Facebook page

Do you have routines or customs that get you out shooting when you otherwise wouldn’t? Let me know in the comments section below, I’d love to hear them.

Categories
Children's portraits Tips/Tutorials

Telling richer stories – a hybrid video/stills approach to children’s photography

Recently, I’ve been thinking a lot about what children’s photography is actually about. You’d think it has a simple answer – it’s about taking photos of kids (duh).

That’s what we do, but that’s not why we do it, whether we’re professionals or taking photographs of our own children. Clients of mine say they want the photographs for a number of reasons – for holiday cards, to send to the grandparents, to mark a birthday, but I think what they really want is to tell the story of their child at a particular time in their life, and (even more importantly) to show how much they love them.

That’s certainly why I do an annual photo session with my own daughter every Fall (here are some images from 2009’s session). We use the same place – our kind neighbor’s lovely garden – and over time these images will build up to an ongoing record of her as she grows and changes.

We want her to look good in the photographs, of course, but more, we want to look authentically like her which is a little different. When I’m showing clients the photographs from their sessions, I can sometimes predict the images they’re going to love, but just as often they see in some of them something about their child that I can’t see (because I don’t know them well enough). It might be a facial expression (‘that’s so him’) or an activity, but it’s something that means more to them than I could have predicted.

Which is why I don’t shoot in a studio and pose the children – I want them to be really them, not to be little models for the afternoon, so they look like themselves when the images come off the camera.

Deepening the Experience

If parents want to tell the story of their child, then still images are definitely one excellent way.

But I’ve also been looking at incorporating video into the mix too. So for this year’s shoot with my daughter, I asked her a few questions on camera, and edited her answers together with some stills.

The real value is not so much in her answers (though these will be nice to have in a few years’ time), but in watching her answer them. Hearing her voice, seeing how she moves – these are the things that bring her to life. The video elements, together with the stills, tell a richer story about her than the stills alone.

Not Hard to Do

This approach is something you can do easily – I shot the video on my Canon 5D II, using an external microphone (that wasn’t quite close enough to my daughter), but you could use any number of video shooting devices for it – iPhone, Flip, whatever. So long as it’s locked down on a tripod or something else similarly stable, you’ll be fine.

As with still photography, look for a spot where the light is relatively even and where the subject will looking out from shade to a brighter area, to get some catchlights that will make their eyes twinkle.

I edited it on iMovie on my Mac, using a free music track sourced from the great Vimeo music library.

I thought about stripping out the voice track and running her answers over some more photographs, but her facial expressions and reactions to the questions were so good that I just kept the audio and video together for the answers, and ducked the level of the audio track up for the photographs, and down for the video.

The grandparents completely loved it, and Fionnuala enjoyed the video session too. Definitely something to do for next year too. I’ll still be taking any number of still images, but I’m happy with the way the impromptu video session came out.

And if you’ve got some examples of a similar hybrid approach you’ve made yourself or seen elsewhere, I’d love to take a look at them.


Categories
Tips/Tutorials

The Curse of the Thumbnail

How many new images did you look at today? How many of those were on websites, or on a tablet or iPhone? Probably too many to count, I’d guess.

A few years ago we consumed our photographs mostly in physical form – a few on TV or in movies but the vast majority in newspapers, books, magazines and billboards. And most of these we saw at a pretty good size.

Now, we get most of our images through the internet, and a lot of them we see are very small, at least initially. This is the curse of the thumbnail.

Read Simple

When we look at a page of thumbnails, some are obviously easier to ‘read’ at a small size than others. The simpler the image, the more it makes sense to us when we can’t see much detail. So simple images with tight crops, strong contrast and bold colors stand out. More complex composition and subtle palettes tend to get lost at this size.

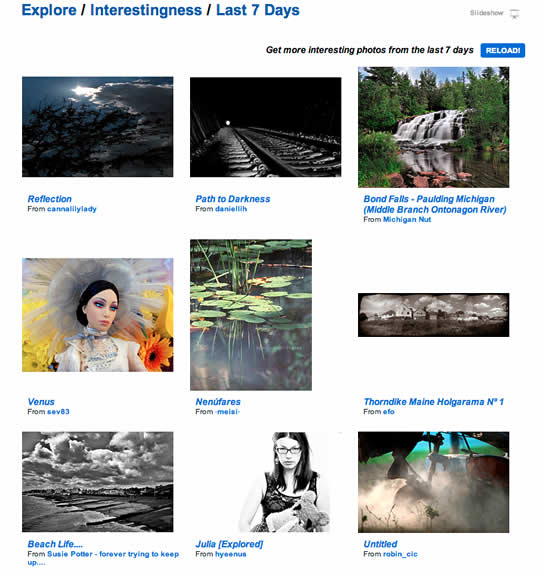
Here’s a page from Flickr’s Explore section recently – my grab is reduce from actual size, so the effect is even greater, but which images are the most immediately compelling? For me, it’s the doll and the railway tracks. I can clearly discern what they’re about.

Some make almost no sense at all seen at this size – the bottom right dusty mechanical thing, for example.

So we gravitate towards the images we think we understand. This is a natural response when we don’t have enough detail to work out what we’re looking at – nobody likes to be confused.

When we click on the thumbnail we can understand, there’s often not that much more to explore when we get to the larger version. Being a simple image isn’t necessarily a bad thing – if that’s what you wanted to say and the image achieves this, then that’s fine.

But what if the photographer wanted to say something that took a bit more explaining? By jumping on the thumbnails of the simpler images, we’re often missing fantastic images.

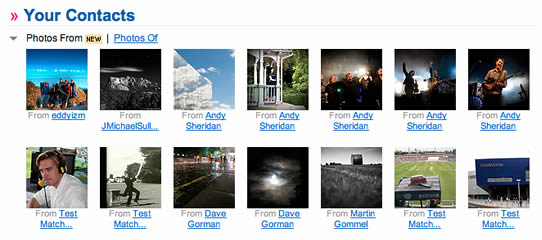
Here’s a grab from my Flickr contacts recently:

From this selection, I might choose one of the concert images to look at larger. But I’d be tempted to skip over the black and white one second from the left on the top row,  because I can’t make it out at that size. Which would be a shame, as it’s a fantastic night time view of Mount Rushmore.

Similarly this is one of my favorite images from this summer (in thumbnail format):

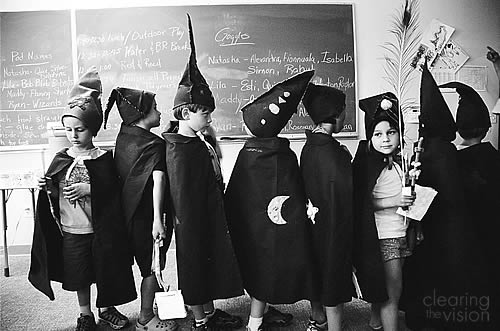
Taken at my daughter’s ‘wizarding camp’ (they made their own cloaks, hats, spell books, wands and rings), it just doesn’t read well as a thumbnail.

But viewed large (as it is below), there’s enough detail for your eye to move around the shot, with the face of the girl on the right being the key element, contrasting with the ordered lines of the rest of the kids facing the other way. Compositionally, it’s not brilliant, but it rewards spending a little time with it.

If you’re as good as Jeff Ascough, however, with great composition that balances elements and leads the eye, seeing patterns as people move through a wedding, then your images really shine under careful examination of large versions. But seen among a bunch of other thumbnails, you might pass over them.

Trouble begins at home

To counter this, photographers are increasingly displaying their images as large as they can online. 1000 pixels wide is not uncommon in photo blogs (such as one of my new favourites Shoot Tokyo), and portfolios often include full-screen slideshow options.

The increasingly popular photosharing site 500px uses much larger thumbnails than Flickr (which has a real whiff of a dead man walking at the moment). But as long as there are web pages, there’ll be small online images, which do some of our images a disservice.

But the problem starts before the images even make it to the computer. We’re all so used to reviewing our images first using the small LCDs on the back of our digital cameras, and these have the same drawbacks as online thumbnails. Simple close-ups read better at that size than more complex compositions.

We like the reassurance that we’re on the right lines as we shoot, but when we respond positively to images that look good on the back of a camera, we (subconsciously I’m sure for most of us) gravitate towards taking those type of shots in the first place.

Think wide and deep

When I started shooting portraits, my first response was definitely like this – get in tight to the face, blur the background and be done with it. There’s nothing wrong with this approach, except if it’s your only approach.

Now I consciously try and look for compositions that show more of the subject and more of their environment. These often take more time to frame correctly – there’s a thin line between distracting clutter and evocative surroundings – and of course the subject’s face is smaller in the frame.

It’s harder to tell if these are working just by looking at the LCD after I’ve taken the image, but of course photographers for decades didn’t have this luxury and had to wait until they got back to the darkroom to see what they’d got. They had to see the shot in their mind before they made the image, rather than just trying a bunch of stuff and seeing that it looked like immediately afterwards.

We would do well to follow this approach. Slowing down when we shoot, visualizing shots in advance, instead of being led solely by the instant feedback from the LCD. We should start thinking a little wider in our compositions, and a little deeper when it comes to evaluating both our images, and other people’s when we see them online. Let’s lift the curse of the thumbnail.

Categories
Personal Tips/Tutorials

When the best camera is the wrong camera

Next time, I'll follow her lead and just bring the point and shoot

Every now and again someone who sees some of my work tells me, ‘Your pictures are really good, you must have a really good camera.”

I know they mean well, but it’s a bit like telling Lionel Messi that his football boots must cost a lot, or a chef that she must have a really good stove.

Most of the time, it’s not about the gear, it’s about the intent and skill with which it’s used. You could put me in a Formula 1 car but I’m not going to set any lap records around the Nürburgring.

The right tool for the job

I’m just back from a week’s vacation in California with the family. I took hundreds of photographs, almost exclusively with the intent of helping me remember the good time we were having. I had no time or inclination to get more serious than that, and it shows in the pictures. I like lots of them, but I don’t think they’re anything special.

I used my 5D Mark II and the 24-105mm f/4L. It’s a great combination – I recently shot a whole feature assignment for a magazine with it – but it was massive overkill for family shots in Legoland.

By the end of the second day of lugging it around, I would gladly have swapped it for a Canon G12, Panasonic Lumix LX5 or a bunch of other decent point-and-shoots. The images would have been more than good enough and my back would have thanked me.

I’m not going print my family shots very large, the light was bright and so long as I shot RAW I could easily make any minor processing adjustments. Given my intentions and constraints, a smaller camera would have worked a lot better. I might not have been able to shoot in burst mode to get decent images of my wife and daughter as they sped by on a roller coaster, but that’s about the only concession I would have had to make.

If I’m taking my time and am serious about the images I’m working on (especially if someone’s paying me), or if the environment is tricky in some way, then I’ll follow Samuel Jackson’s advice in Jackie Brown: ‘The Canon 5D Mark II – the very best there is. When you absolutely positively gotta kill every image in the room, except no substitute.’ (at least I think that’s what he said, more or less).

But you don’t need such firepower a lot of the time, and the camera’s not going to create great images if the person behind it isn’t really trying.

So yes, I do have a really good camera, but I still take bad pictures with it. And I take much better pictures with a less good camera – some of my favorite images were taken with my old Rebel XT and the plasticky 50mm f/1.8, and I love some of my iPhone shots.

Where’s the Un-Suck button?

The takeaway from this is two-fold. Firstly, a good camera isn’t going to get you good images by itself. I know this sounds obvious, but I also know how long I’ve spent poring over camera and lens reviews, when I could have been taking photos with the camera I already have, or learning something from a good e-Book (this one on black and white processing is great, by the way).

The second conclusion is that (fortunately), the things that will get you good images don’t cost very much – intention, time, practice, experience, patience, thought.

Canon and Nikon don’t sell those, just like there’s no Unsuck button in Photoshop, and they do take effort to acquire but they’re light, cross-platform and you always have them with you.

But sometimes you’re just taking photos of your kid like a normal civilian; and that’s OK too.